Installing and configuring a Hadoop cluster
As I mentioned in a previous post, Hadoop has great potential and is one of the best known projects for Big Data. Now, let’s take a deeper look into Hadoop and how it works. So, let’s roll up our sleeves and actually work with Hadoop. For that, we will install and configure a Hadoop cluster. Our cluster will consists on four nodes (one master and three slaves). So I provisioned four cloud servers:
atlbz153122.cloud.example.com (IP Address: 9.9.153.122) (alias: master)
atlbz153120.cloud.example.com (IP Address: 9.9.153.120) (alias: slave-1)
atlbz153078.cloud.example.com (IP Address: 9.9.153.78)  (alias: slave-2)
atlbz153064.cloud.example.com (IP Address: 9.9.153.64)  (alias: slave-3)
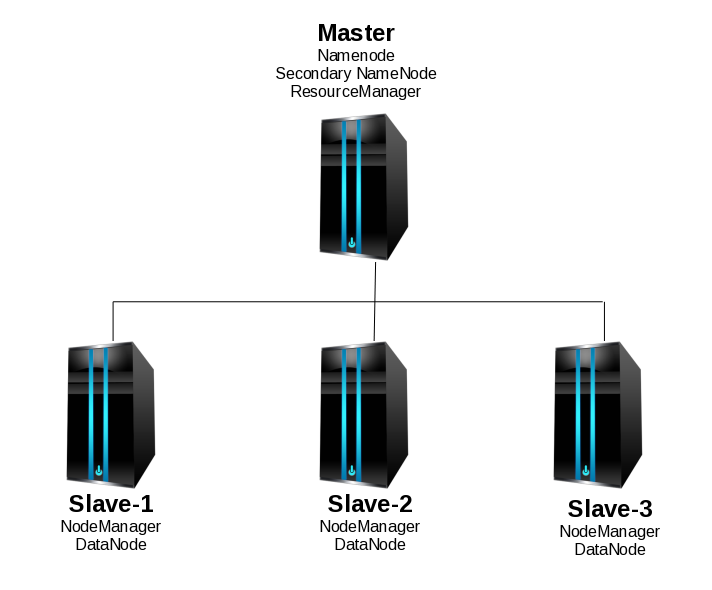
We designated atlbz153122 as the master for no reason in particular. The aliases can be modified according to your needs. I.e. If you are using these same hosts for other cluster projects, you may want to specify the aliases as “hadoop-master” or “hadoop-slave-1”. They were created using the same image, so all of them have this setup:
Number of CPU(s): 2
Number of tenths of physical CPUs: 2
Amount of Memory: 6144 MB
OS: Red Hat Enterprise Linux Server release 6.7 (Santiago)
Java version: 1.6.0 Java(TM) SE Runtime Environment (build pxa6460sr9-20101125_01(SR9))
Initial setup:
In every node, we will do the following:
-Create a hadoop user account (Of course, you can chose to name it differently), and add it to the sudoers group.
useradd hadoop; passwd hadoop
-Optionally (but extremely recommended), map all the hostnames in the respective /etc/hosts files.
-Copy SSH keys between all the nodes.
Obviously, first we need to make sure SSH is up and running on all the servers. This step could be different for you according to your security requirements, but the goal here is to allow Hadoop and its processes to communicate between the nodes without prompting for credentials.
-Generate SSH keys.
ssh-keygen -t rsa
-Copy the keys.
What I do is to create a list of all the public keys and then add that master list to the authorized keys in all the hosts.
-Now check that you can ssh to the localhost and all the other nodes without a passphrase:
ssh localhost
ssh hadoop@master
ssh hadoop@slave-1
ssh hadoop@slave-2
ssh hadoop@slave-3
-Create a basic file structure and set the ownership to the Hadoop user you created before.
mkdir /opt/hadoop/
sudo chown -R hadoop:hadoop /opt/hadoop/
-Setup Java.
As mentioned above, in this image Java is pre-installed. The Java version that comes pre-installed in this RHEL image should work for us since the Hadoop Java versions page says it has been tested with IBM Java 6 SR 8. Just make sure that your Java version is compatible.
-Add the following to the root and Hadoop user ~/.bashrc file (and modify according to your needs):
# -- HADOOP ENVIRONMENT VARIABLES START -- #
export HADOOP_HOME=/opt/hadoop/hadoop
export PATH=$PATH:$HADOOP_HOME/bin
export PATH=$PATH:$HADOOP_HOME/sbin
export HADOOP_MAPRED_HOME=$HADOOP_HOME
export HADOOP_COMMON_HOME=$HADOOP_HOME
export HADOOP_HDFS_HOME=$HADOOP_HOME
export YARN_HOME=$HADOOP_HOME
export HADOOP_COMMON_LIB_NATIVE_DIR=$HADOOP_HOME/lib/native
export HADOOP_OPTS="-Djava.library.path=$HADOOP_HOME/lib"
# -- HADOOP ENVIRONMENT VARIABLES END -- #
From now on, in order to save time, we will install and do a basic setup of Hadoop in the master node, then copy that basic setup to the slaves and then perform specific customizations in each of them.
From the master node, download the latest Hadoop tarball (version 2.6.2 at the time of this writing) from one of the mirrors and extract its contents in the previously created Hadoop home:
cd /opt/hadoop/
wget http://apache.mirrors.tds.net/hadoop/common/hadoop-2.6.2/hadoop-2.6.2.tar.gz
tar xvf hadoop-2.6.2.tar.gz
Update core-site.xml (located in $HADOOP_HOME/hadoop/etc/hadoop/core-site.xml), we will change “localhost” to our master node hostname, IP, or alias. In our case, it would be like this:
<configuration>
    <property>
        <name>fs.default.name</name>
        <value>hdfs://master:9000/</value>
    </property>
    <property>
        <name>fs.default.FS</name>
        <value>hdfs://master:9000/</value>
    </property>
</configuration>
Update hdfs-site.xml (located in $HADOOP_HOME/hadoop/etc/hadoop/hdfs-site.xml), we will change the replication factor to 3, and specify the datanode and namenodes directories (take note of these, since we will create them later), as well as add an http address:
<property>
    <name>dfs.datanode.data.dir</name>
    <value>/opt/hadoop_tmp/hdfs/datanode</value>
    <final>true</final>
</property>
<property>
    <name>dfs.namenode.name.dir</name>
    <value>/opt/hadoop_tmp/hdfs/namenode</value>
    <final>true</final>
</property>
<property>
    <name>dfs.namenode.http-address</name>
    <value>master:50070</value>
</property>
<property>
    <name>dfs.replication</name>
    <value>3</value>
</property>
Update yarn-site.xml (located in $HADOOP_HOME/hadoop/etc/hadoop/yarn-site.xml). There will be 3 properties that we need to update with our master node hostname or alias:
<property>
    <name>yarn.resourcemanager.resource-tracker.address</name>
    <value>master:8025</value>
</property>
<property>
    <name>yarn.resourcemanager.scheduler.address</name>
    <value>master:8035</value>
</property>
<property>
    <name>yarn.resourcemanager.address</name>
    <value>master:8050</value>
</property>
Update mapred-site.xml (located in $HADOOP_HOME/hadoop/etc/hadoop/mapred-site.xml), we will add the following properties:
<property>
    <name>mapreduce.job.tracker</name>
    <value>master:5431</value>
</property>
<property>
    <name>mapred.framework.name</name>
    <value>yarn</value>
</property>
Update the masters file (located in $HADOOP_HOME/hadoop/etc/masters). We only need to add the hostname or alias of the master node. So in our case this file will only contain one line:
master
Update the slaves file (located in $HADOOP_HOME/hadoop/etc/slaves). I am sure you already know what to do here, we will only add our slaves nodes to the file, one alias per line. In our case:
slave-1
slave-2
slave-3
This concludes the basic setup, we will now transfer all the files to the slave nodes and continue the customizations there.
On the master node, run the following commands in order to copy the basic setup to the slaves (you can also do this with scp):
rsync -avxP <$HADOOP_HOME> <hadoop_user>@<slave-hostname>:<$HADOOP_HOME>
In our case, it would be something like this:
rsync -avxP /opt/hadoop/ hadoop@slave-1:/opt/hadoop/
rsync -avxP /opt/hadoop/ hadoop@slave-2:/opt/hadoop/
rsync -avxP /opt/hadoop/ hadoop@slave-3:/opt/hadoop/
Now, we need to perform some changes exclusively to the master node:
We will create a directory that will be used for HDFS. I decided to create it in /opt/hadoop/hadoop_tmp
Inside that directory, create another with the name “hdfs” and there, create yet another one named “namenode”. So you will have something like this:
/opt/hadoop_tmp/hdfs/namenode
Once the basic installation is in all four nodes and the master is properly configured, we can go ahead and perform the customizations in the slaves nodes.
We will create a directory that will be used for HDFS. I decided to create it in /opt/hadoop/hadoop_tmp (you can choose anything else, but make sure it is consistent with the contents of hdfs-site.xml)
Inside that directory, create another with the name “hdfs” and there, create yet another one named “datanode”. So you will have something like this:
/opt/hadoop_tmp/hdfs/datanode
Again, all the files inside your Hadoop home should be owned by the Hadoop user you created. Otherwise you may get “Permission denied” errors while starting the services.
sudo chown hadoop:hadoop -R /opt/hadoop/hadoop_tmp
Back in the master, format the namenode:
hadoop@master: /opt/hadoop/hadoop/bin/$ ./hdfs namenode -format
Finally, start the services. Previously, Hadoop used the start-all.sh script for this, but it has been deprecated and the recommended method now is to use the start-
There are several ways to confirm that everything is running properly, for example, you can point your browser to http://master:50070 or http://master:8088. You can also check the Java processes in the nodes. In the master node you should see at least 3 processes: NameNode, SecondaryNameNode and ResourceManager. In the slaves you should see only two: NodeManager and DataNode. My favourite way is to use the hdfs report command. This is the output report of my configuration:
Congratulations! At this point, Hadoop is configured and running. You can stop here, but I would prefer to run a test, just to make sure everything is working correctly. We will upload some files to the HDFS.
Let’s create a file locally and add text to it (courtesy of loremgibson.com) just so we see it is replicated to all the nodes:
Hadoop is not hard to install nor configure, but you need to pay very close attention to many aspects, otherwise you will get obscure errors and since this is a “new” technology, the amount of useful help you can get is not great. Also, since this a complex technology, many problems can arise and are hard to troubleshoot. Sadly, there are not many online resources that are easy to follow, or the ones that are written properly are mostly outdated already. Personally, I had to read many tutorials and do a lot of troubleshooting in order to setup this correctly because many of the tutorials I read omitted bits of important information. There are, however, other projects that can help with the administration of Hadoop and its components. Two good examples are IBM BigInsights and Ambari. Even without those tools, adding and removing Hadoop nodes is very easy once the basic setup is correctly configured. I am nowhere near of being an expert on Big Data yet, but I tried my best to write this post as clear as possible and I truly hope it is useful. Big Data is undoubtedly here to stay and this kind of publications are indeed a valuable resource for newcomers.
/opt/hadoop/hadoop/sbin/start-dfs.sh
Starting namenodes on [master]
master: starting namenode, logging to /opt/hadoop/hadoop/logs/hadoop-root-namenode-atlbz153122.out
slave-2: starting datanode, logging to /opt/hadoop/hadoop/logs/hadoop-root-datanode-atlbz153078.out
slave-3: starting datanode, logging to /opt/hadoop/hadoop/logs/hadoop-root-datanode-atlbz153064.out
slave-1: starting datanode, logging to /opt/hadoop/hadoop/logs/hadoop-root-datanode-atlbz153120.out
Starting secondary namenodes [0.0.0.0]
0.0.0.0: starting secondarynamenode, logging to /opt/hadoop/hadoop/logs/hadoop-root-secondarynamenode-atlbz153122.out

/opt/hadoop/hadoop/sbin/start-yarn.sh
starting yarn daemons
starting resourcemanager, logging to /opt/hadoop/hadoop/logs/yarn-root-resourcemanager-atlbz153122.out
slave-2: starting nodemanager, logging to /opt/hadoop/hadoop/logs/yarn-root-nodemanager-atlbz153078.out
slave-3: starting nodemanager, logging to /opt/hadoop/hadoop/logs/yarn-root-nodemanager-atlbz153064.out
slave-1: starting nodemanager, logging to /opt/hadoop/hadoop/logs/yarn-root-nodemanager-atlbz153120.out
/opt/hadoop/hadoop/bin/hdfs dfsadmin -report
Configured Capacity: 189496233984 (176.48 GB)
Present Capacity: 174329384960 (162.36 GB)
DFS Remaining: 174329225216 (162.36 GB)
DFS Used: 159744 (156 KB)
DFS Used%: 0.00%
Under replicated blocks: 0
Blocks with corrupt replicas: 0
Missing blocks: 0
-------------------------------------------------
Live datanodes (3):

Name: 9.9.153.64:50010 (slave-3)
Hostname: atlbz153064.bz.atlanta.example.com
Decommission Status : Normal
Configured Capacity: 63165411328 (58.83 GB)
DFS Used: 53248 (52 KB)
Non DFS Used: 5051596800 (4.70 GB)
DFS Remaining: 58113761280 (54.12 GB)
DFS Used%: 0.00%
DFS Remaining%: 92.00%
Configured Cache Capacity: 0 (0 B)
Cache Used: 0 (0 B)
Cache Remaining: 0 (0 B)
Cache Used%: 100.00%
Cache Remaining%: 0.00%
Xceivers: 1
Last contact: Tue Jan 05 18:46:14 EST 2016

Name: 9.9.153.78:50010 (slave-2)
Hostname: atlbz153078.bz.atlanta.example.com
Decommission Status : Normal
Configured Capacity: 63165411328 (58.83 GB)
DFS Used: 53248 (52 KB)
Non DFS Used: 5051629568 (4.70 GB)
DFS Remaining: 58113728512 (54.12 GB)
DFS Used%: 0.00%
DFS Remaining%: 92.00%
Configured Cache Capacity: 0 (0 B)
Cache Used: 0 (0 B)
Cache Remaining: 0 (0 B)
Cache Used%: 100.00%
Cache Remaining%: 0.00%
Xceivers: 1
Last contact: Tue Jan 05 18:46:14 EST 2016

Name: 9.9.153.120:50010 (atlbz153120.bz.atlanta.example.com)
Hostname: atlbz153120.bz.atlanta.ibm.com
Decommission Status : Normal
Configured Capacity: 63165411328 (58.83 GB)
DFS Used: 53248 (52 KB)
Non DFS Used: 5063622656 (4.72 GB)
DFS Remaining: 58101735424 (54.11 GB)
DFS Used%: 0.00%
DFS Remaining%: 91.98%
Configured Cache Capacity: 0 (0 B)
Cache Used: 0 (0 B)
Cache Remaining: 0 (0 B)
Cache Used%: 100.00%
Cache Remaining%: 0.00%
Xceivers: 1
Last contact: Tue Jan 05 18:46:15 EST 2016
/opt/hadoop/hadoop/bin/hadoop fs -df -h
Filesystem             Size   Used  Available  Use%
hdfs://master:9000  176.5 G  156 K    162.4 G    0%
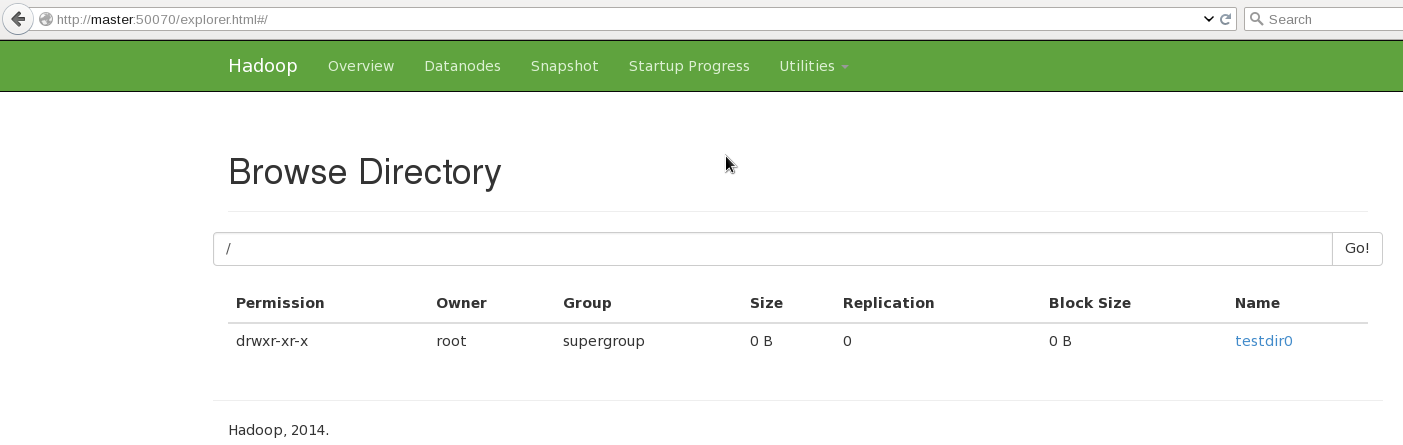
Make a test directory:
/opt/hadoop/hadoop/bin/hadoop fs -mkdir hdfs://master:9000/testdir0
[ ](https://raw.githubusercontent.com/alanverdugo/alanverdugo.github.io/master/wp-content/uploads/2016/01/hadoopFS1.png)
List the contents of root:
](https://raw.githubusercontent.com/alanverdugo/alanverdugo.github.io/master/wp-content/uploads/2016/01/hadoopFS1.png)
List the contents of root:
/opt/hadoop/hadoop/bin/hadoop fs -ls hdfs://master:9000/
Found 1 items
drwxr-xr-x   - root supergroup          0 2016-01-05 18:19 hdfs://master:9000/testdir0
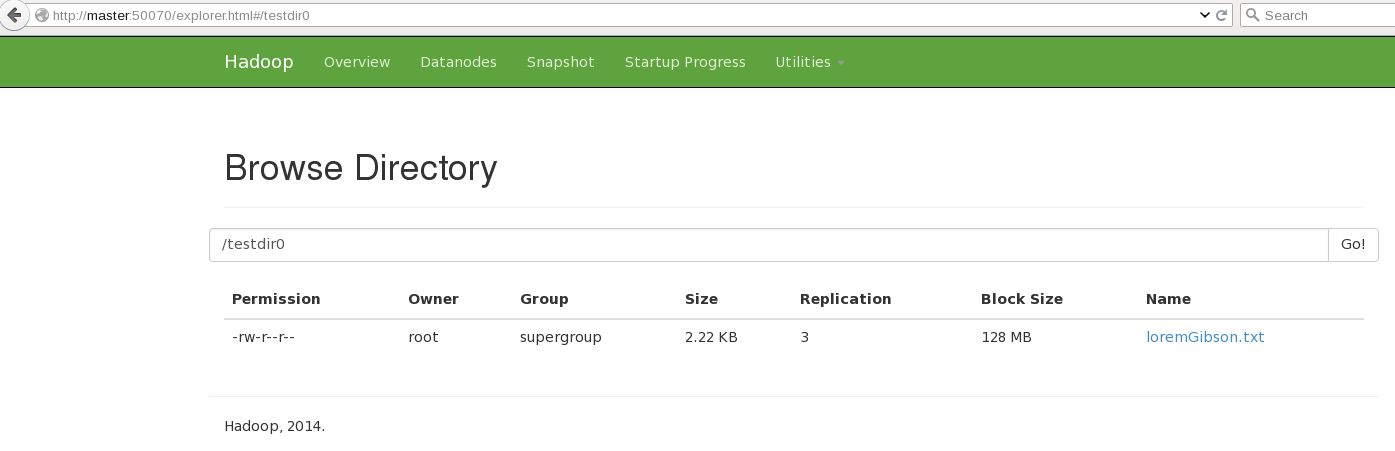
vim /tmp/testdir1/loremGibson.txt
Then add our text file to our new directory:
/opt/hadoop/hadoop/bin/hadoop fs -copyFromLocal /tmp/testdir1/loremGibson.txt hdfs://master:9000/testdir0/loremGibson.txt
[ ](https://raw.githubusercontent.com/alanverdugo/alanverdugo.github.io/master/wp-content/uploads/2016/01/hadoopFS2.png)
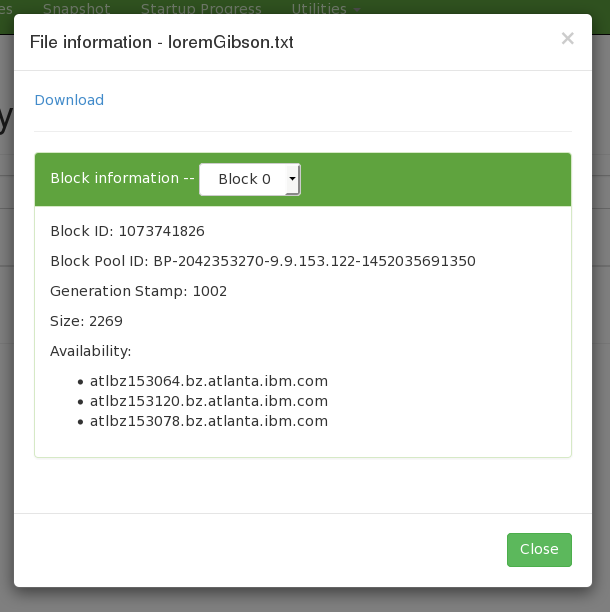
Now you can see that our file has been automatically replicated to all 3 nodes!
](https://raw.githubusercontent.com/alanverdugo/alanverdugo.github.io/master/wp-content/uploads/2016/01/hadoopFS2.png)
Now you can see that our file has been automatically replicated to all 3 nodes!
 **Conclusion:**